之前用一张图分析了Google给出的MVP架构,但是在Google给出的所有案例里面除了基本的MVP架构还有其它几种架构,今天就来分析其中的Clean架构。同样的,网上介绍Clean架构的文章很多,我也就不用文字过多叙述了,还是用一张类图来分析一下Clean架构的这个案例吧。好了,先直接上图!
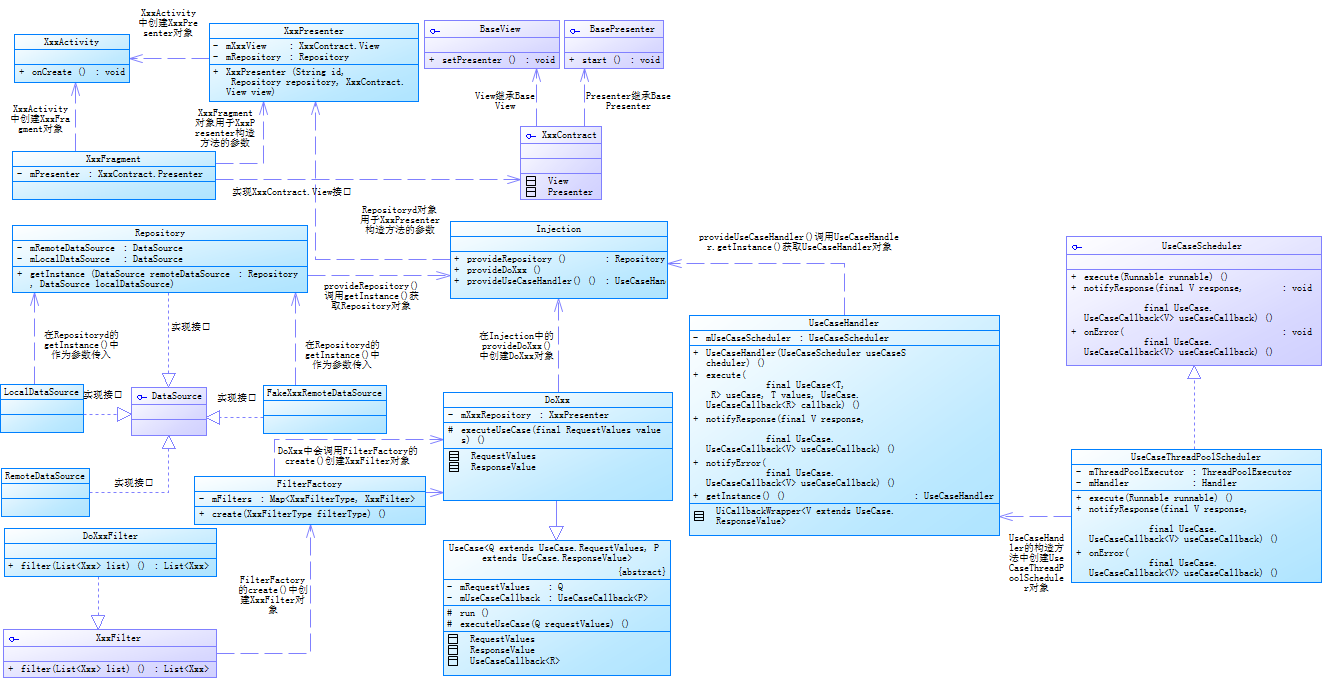
上完图,再说一说我对Clean架构的一个理解吧。对比前一篇文章的MVP架构图可以看出,clean在一定程度上继承了mvp的设计思想,但是其抽象程度比mvp更高。初次看这个demo的时候,确实被震撼了一下——原来用Java可以这样写代码!!!跟之前用的一些项目框架和我自己平时写的一些代码对比一下,只能感叹clean的这种设计思想真不是一般的程序员可以想出来的。它对接口、抽象类和实现类之间的实现、继承、调用关系发挥到了一个比较高的层次,它并不是像我们平时写代码那样很直白地写下来,而是充分利用了面向对象的封装性、继承性和多态性,是对面向对象思想的一个高度理解。其实,要说clean复杂,它确实有些难理解,可是如果你真的理解了面向对象思想,那么又会觉得这样的设计完全在情理之中。
举个例子,在这个案例里面,对实体类的设计就进行了高度的抽象与封装。首先,为所有的实体类设计了基类——UseCase,UseCase的代码如下:
/*
 * Copyright 2016, The Android Open Source Project
 *
 * Licensed under the Apache License, Version 2.0 (the "License");
 * you may not use this file except in compliance with the License.
 * You may obtain a copy of the License at
 *
 *      http://www.apache.org/licenses/LICENSE-2.0
 *
 * Unless required by applicable law or agreed to in writing, software
 * distributed under the License is distributed on an "AS IS" BASIS,
 * WITHOUT WARRANTIES OR CONDITIONS OF ANY KIND, either express or implied.
 * See the License for the specific language governing permissions and
 * limitations under the License.
 */

package com.example.android.architecture.blueprints.todoapp;

/**
 * Use cases are the entry points to the domain layer.
 *
 * @param <Q> the request type
 * @param <P> the response type
 */
public abstract class UseCase<Q extends UseCase.RequestValues, P extends UseCase.ResponseValue> {

    private Q mRequestValues;

    private UseCaseCallback<P> mUseCaseCallback;

    public void setRequestValues(Q requestValues) {
        mRequestValues = requestValues;
    }

    public Q getRequestValues() {
        return mRequestValues;
    }

    public UseCaseCallback<P> getUseCaseCallback() {
        return mUseCaseCallback;
    }

    public void setUseCaseCallback(UseCaseCallback<P> useCaseCallback) {
        mUseCaseCallback = useCaseCallback;
    }

    void run() {
       executeUseCase(mRequestValues);
    }

    protected abstract void executeUseCase(Q requestValues);

    /**
     * Data passed to a request.
     */
    public interface RequestValues {
    }

    /**
     * Data received from a request.
     */
    public interface ResponseValue {
    }

    public interface UseCaseCallback<R> {
        void onSuccess(R response);
        void onError();
    }
}
实体基类UseCase的设计用了泛型和接口,仅仅设计了两个字段mRequestValues和mUseCaseCallback。其中,mRequestValues代表数据请求参数,用泛型进行了封装,它其实也是一个类的对象;mUseCaseCallback代表请求结果,同样的,它也是一个类的对象,只不过这个类是用接口的形式进行抽象和封装的。同时,UseCase中定义抽象方法executeUseCase()作为实体操作的入口。
接下来,我们随便看一个UseCase的实现类,就拿ActivateTask来说,ActivateTask继承了UseCase,其实现代码如下:
/*
 * Copyright 2016, The Android Open Source Project
 *
 * Licensed under the Apache License, Version 2.0 (the "License");
 * you may not use this file except in compliance with the License.
 * You may obtain a copy of the License at
 *
 *      http://www.apache.org/licenses/LICENSE-2.0
 *
 * Unless required by applicable law or agreed to in writing, software
 * distributed under the License is distributed on an "AS IS" BASIS,
 * WITHOUT WARRANTIES OR CONDITIONS OF ANY KIND, either express or implied.
 * See the License for the specific language governing permissions and
 * limitations under the License.
 */

package com.example.android.architecture.blueprints.todoapp.tasks.domain.usecase;

import android.support.annotation.NonNull;

import com.example.android.architecture.blueprints.todoapp.UseCase;
import com.example.android.architecture.blueprints.todoapp.data.source.TasksRepository;

import static com.google.common.base.Preconditions.checkNotNull;

/**
 * Marks a task as active (not completed yet).
 */
public class ActivateTask extends UseCase<ActivateTask.RequestValues, ActivateTask.ResponseValue> {

    private final TasksRepository mTasksRepository;

    public ActivateTask(@NonNull TasksRepository tasksRepository) {
        mTasksRepository = checkNotNull(tasksRepository, "tasksRepository cannot be null!");
    }

    @Override
    protected void executeUseCase(final RequestValues values) {
        String activeTask = values.getActivateTask();
        mTasksRepository.activateTask(activeTask);
        getUseCaseCallback().onSuccess(new ResponseValue());
    }

    public static final class RequestValues implements UseCase.RequestValues {

        private final String mActivateTask;

        public RequestValues(@NonNull String activateTask) {
            mActivateTask = checkNotNull(activateTask, "activateTask cannot be null!");
        }

        public String getActivateTask() {
            return mActivateTask;
        }
    }

    public static final class ResponseValue implements UseCase.ResponseValue { }
}
可以看到,在ActivateTask 中,实现了父类UseCase的两个接口RequestValues 和ResponseValue ,这两个类将分别作为最终的实体请求对象类和返回结果对象类,同时,UseCase中的抽象方法executeUseCase()也被实现。因为实现的代码里面加入了泛型和接口,所以看起来会比较复杂,但是说到底无非就是继承和实现的关系,仅此而已。通过这种面向接口的设计方式,可以让我们的代码看起来结构更清晰、更统一。
接下来,我们可以看一下这个项目中的任务执行类UseCaseThreadPoolScheduler,同样,UseCaseThreadPoolScheduler的设计采用了面向接口的方式,它实现了seCaseScheduler接口,UseCaseScheduler和UseCaseThreadPoolScheduler的实现分别如下:
/*
 * Copyright 2016, The Android Open Source Project
 *
 * Licensed under the Apache License, Version 2.0 (the "License");
 * you may not use this file except in compliance with the License.
 * You may obtain a copy of the License at
 *
 *      http://www.apache.org/licenses/LICENSE-2.0
 *
 * Unless required by applicable law or agreed to in writing, software
 * distributed under the License is distributed on an "AS IS" BASIS,
 * WITHOUT WARRANTIES OR CONDITIONS OF ANY KIND, either express or implied.
 * See the License for the specific language governing permissions and
 * limitations under the License.
 */

package com.example.android.architecture.blueprints.todoapp;

/**
 * Interface for schedulers, see {@link UseCaseThreadPoolScheduler}.
 */
public interface UseCaseScheduler {

    void execute(Runnable runnable);

    <V extends UseCase.ResponseValue> void notifyResponse(final V response,
            final UseCase.UseCaseCallback<V> useCaseCallback);

    <V extends UseCase.ResponseValue> void onError(
            final UseCase.UseCaseCallback<V> useCaseCallback);
}
/*
 * Copyright 2016, The Android Open Source Project
 *
 * Licensed under the Apache License, Version 2.0 (the "License");
 * you may not use this file except in compliance with the License.
 * You may obtain a copy of the License at
 *
 *      http://www.apache.org/licenses/LICENSE-2.0
 *
 * Unless required by applicable law or agreed to in writing, software
 * distributed under the License is distributed on an "AS IS" BASIS,
 * WITHOUT WARRANTIES OR CONDITIONS OF ANY KIND, either express or implied.
 * See the License for the specific language governing permissions and
 * limitations under the License.
 */

package com.example.android.architecture.blueprints.todoapp;

import android.os.Handler;

import java.util.concurrent.ArrayBlockingQueue;
import java.util.concurrent.Executors;
import java.util.concurrent.ThreadPoolExecutor;
import java.util.concurrent.TimeUnit;

/**
 * Executes asynchronous tasks using a {@link ThreadPoolExecutor}.
 * <p>
 * See also {@link Executors} for a list of factory methods to create common
 * {@link java.util.concurrent.ExecutorService}s for different scenarios.
 */
public class UseCaseThreadPoolScheduler implements UseCaseScheduler {

    private final Handler mHandler = new Handler();

    public static final int POOL_SIZE = 2;

    public static final int MAX_POOL_SIZE = 4;

    public static final int TIMEOUT = 30;

    ThreadPoolExecutor mThreadPoolExecutor;

    public UseCaseThreadPoolScheduler() {
        mThreadPoolExecutor = new ThreadPoolExecutor(POOL_SIZE, MAX_POOL_SIZE, TIMEOUT,
                TimeUnit.SECONDS, new ArrayBlockingQueue<Runnable>(POOL_SIZE));
    }

    @Override
    public void execute(Runnable runnable) {
        mThreadPoolExecutor.execute(runnable);
    }

    @Override
    public <V extends UseCase.ResponseValue> void notifyResponse(final V response,
            final UseCase.UseCaseCallback<V> useCaseCallback) {
        mHandler.post(new Runnable() {
            @Override
            public void run() {
                useCaseCallback.onSuccess(response);
            }
        });
    }

    @Override
    public <V extends UseCase.ResponseValue> void onError(
            final UseCase.UseCaseCallback<V> useCaseCallback) {
        mHandler.post(new Runnable() {
            @Override
            public void run() {
                useCaseCallback.onError();
            }
        });
    }

}
可以看出,UseCaseThreadPoolScheduler实现了UseCaseScheduler中的三个抽象方法。
接下来,我们再看看UseCaseHandler这个类,在UseCaseHandler中,通过子类实例化父类的形式,用UseCaseThreadPoolScheduler实例化了UseCaseScheduler对象。UseCaseHandler的代码如下:
/*
 * Copyright 2016, The Android Open Source Project
 *
 * Licensed under the Apache License, Version 2.0 (the "License");
 * you may not use this file except in compliance with the License.
 * You may obtain a copy of the License at
 *
 *      http://www.apache.org/licenses/LICENSE-2.0
 *
 * Unless required by applicable law or agreed to in writing, software
 * distributed under the License is distributed on an "AS IS" BASIS,
 * WITHOUT WARRANTIES OR CONDITIONS OF ANY KIND, either express or implied.
 * See the License for the specific language governing permissions and
 * limitations under the License.
 */

package com.example.android.architecture.blueprints.todoapp;


import com.example.android.architecture.blueprints.todoapp.util.EspressoIdlingResource;

/**
 * Runs {@link UseCase}s using a {@link UseCaseScheduler}.
 */
public class UseCaseHandler {

    private static UseCaseHandler INSTANCE;

    private final UseCaseScheduler mUseCaseScheduler;

    public UseCaseHandler(UseCaseScheduler useCaseScheduler) {
        mUseCaseScheduler = useCaseScheduler;
    }

    public <T extends UseCase.RequestValues, R extends UseCase.ResponseValue> void execute(
            final UseCase<T, R> useCase, T values, UseCase.UseCaseCallback<R> callback) {
        useCase.setRequestValues(values);
        useCase.setUseCaseCallback(new UiCallbackWrapper(callback, this));

        // The network request might be handled in a different thread so make sure
        // Espresso knows
        // that the app is busy until the response is handled.
        EspressoIdlingResource.increment(); // App is busy until further notice

        mUseCaseScheduler.execute(new Runnable() {
            @Override
            public void run() {

                useCase.run();
                // This callback may be called twice, once for the cache and once for loading
                // the data from the server API, so we check before decrementing, otherwise
                // it throws "Counter has been corrupted!" exception.
                if (!EspressoIdlingResource.getIdlingResource().isIdleNow()) {
                    EspressoIdlingResource.decrement(); // Set app as idle.
                }
            }
        });
    }

    public <V extends UseCase.ResponseValue> void notifyResponse(final V response,
            final UseCase.UseCaseCallback<V> useCaseCallback) {
        mUseCaseScheduler.notifyResponse(response, useCaseCallback);
    }

    private <V extends UseCase.ResponseValue> void notifyError(
            final UseCase.UseCaseCallback<V> useCaseCallback) {
        mUseCaseScheduler.onError(useCaseCallback);
    }

    private static final class UiCallbackWrapper<V extends UseCase.ResponseValue> implements
            UseCase.UseCaseCallback<V> {
        private final UseCase.UseCaseCallback<V> mCallback;
        private final UseCaseHandler mUseCaseHandler;

        public UiCallbackWrapper(UseCase.UseCaseCallback<V> callback,
                UseCaseHandler useCaseHandler) {
            mCallback = callback;
            mUseCaseHandler = useCaseHandler;
        }

        @Override
        public void onSuccess(V response) {
            mUseCaseHandler.notifyResponse(response, mCallback);
        }

        @Override
        public void onError() {
            mUseCaseHandler.notifyError(mCallback);
        }
    }

    public static UseCaseHandler getInstance() {
        if (INSTANCE == null) {
            INSTANCE = new UseCaseHandler(new UseCaseThreadPoolScheduler());
        }
        return INSTANCE;
    }
}
从上面的代码中,我们可以看到,声明的变量mUseCaseScheduler是UseCaseScheduler的对象,但是在构建UseCaseHandler对象的时候,传入的参数却是UseCaseThreadPoolScheduler对象,即用UseCaseThreadPoolScheduler实例化了UseCaseScheduler对象。然后,对mUseCaseScheduler的所有操作都转化成了对UseCaseThreadPoolScheduler对象的操作。
然后,我们仔细看UseCaseHandler的实现的代码,我们会发现其实对实体进行操作的入口就是execute()方法!因为这个方法里面调用了UseCase的run(),而UseCase的run()最终调用了UseCase的executeUseCase()。通过刚刚的分析,我们应该知道,我们实际上操作的实体应该是UseCase的实现类,而不是UseCase类本身,那么这中间是通过什么方式将对UseCase的操作转移到UseCase的实现类上面的呢?我们会发现UseCaseHandler的execute()传入了UseCase对象作为参数,好的,那么我们就看看execute()是在哪里被调用的吧!
经过追踪,我们看到在TasksPresenter类中调用了此方法,调用处的代码如下:
@Override
    public void activateTask(@NonNull Task activeTask) {
        checkNotNull(activeTask, "activeTask cannot be null!");
        mUseCaseHandler.execute(mActivateTask, new ActivateTask.RequestValues(activeTask.getId()),
                new UseCase.UseCaseCallback<ActivateTask.ResponseValue>() {
                    @Override
                    public void onSuccess(ActivateTask.ResponseValue response) {
                        mTasksView.showTaskMarkedActive();
                        loadTasks(false, false);
                    }

                    @Override
                    public void onError() {
                        mTasksView.showLoadingTasksError();
                    }
                });
    }
可以看到,我们传入的参数实际上是UseCase的实现类ActivateTask的对象,到这里,我们就明白啦!原来也是子类实例化父类的方式。
上面我只是简单粗略地讲述了一下项目中部分模块的代码,仅仅是举个例子,更多的东西需要大家自己用面向对象的思想去理解。我说这些的目的就是想告诉大家,充分运面向对象的思想就可以设计出很多看似复杂的架构和项目,但是不管再怎么复杂的代码也肯定是有迹可循的,我们只要抓住了这些设计思想的本质,多看几遍代码,一定会豁然开朗!